


Step-by-Step Analysis for Creating Business Website Using WordPress
At the current time, every business owner needs to have a unique and engaging website. It allows your business to showcase everything that businesses have to offer for the rest of the world. When you have access to a website, you are not limited to a specific number of customers. Your business will reach out to the target market. If you have a website on online writing services, your target audience will be students who can easily hire professional essay writers.
What if we tell you that you do not need to hire a developer and you can do it all on your own? When you bring your business online, you will be able to promote your services and products to a wider scale of audience.
You will also not have to deal with any coding for designing a stellar website for your business. WordPress is the easiest way to create a stunning website. You can customize just the way you want. It has an impressive collection of the free and paid plugin, including amazing features like Google Maps, slideshows, social sharing buttons, contact forms, and ore. Anyone can create a website in a matter of hours. Although basic HTML coding knowledge is helpful, it is not necessary when you are using WordPress.
Here is a simple guide for designing a website with WordPress.
Step 1: Select a WordPress plan
For building an appropriate website, you must select an appropriate WordPress plan. Your WordPress.com includes (free) plan option, which will lead you to host provider, domain, themes, plugins, and everything else related to the WordPress site.
Step 2: Select a domain name
One of the vital steps of building a website for the business is selecting a domain name for your business, including .com that presents your business name. There are web hosting services like Hostinger and Wix, which offer a domain. However, some experts suggest keeping your hosting services and domain name separate to ensure that you have ownership and control over the domain.
Step 3: Connect your domain with web host services
After you are done signing up for hosting, you will find your login account and your nameserver address. Your first step will be to copy the nameserver information, head to the registrar, and then you can add the nameserver information into the domain name.
Step 4: Install WordPress
You will no longer have to download the script from WordPress and uploading it to your host. Most of the hosts are offering a quick install option through their script history. All you need to do is log in to the hosting account to find the Word Press script. After that, click on “Install” and point to where you want the script to install.
Here is a simple step to install WordPress:
- Log in to the cPanel using the username and password which your host provides.
- Find the Website Installers or one Click Installers section
- Select the options WordPress and click on the Install button
- Fill up all the information asked for you and click on the Install button again.
- Receive a message which says your WordPress is installed, and you may log in to the WordPress dashboard.
Step 5: Choose your preferred theme
You will easily customize the WordPress website by using impressive themes and templates that involve a multitude of formatting styles, fonts, layouts, colors, and other visual options. You need to create a student-friendly website so that they face no trouble with hiring essay writers. The custom-built WordPress theme will help you make your website look professional and appealing. You have the option to choose from the hundreds of themes and templates.
If you intend to find a theme that works best for you, follow the steps mentioned below:
- Click on the Appearance and select the option saying ‘Themes’.
- You will come to another screen where you can browse all the available themes.
- Install the theme to start customizing.
- Each theme comes with a specific process during customization. So ensure that you follow them.
Step 6: Add posts and pages
Image source: https://pixabay.com/photos/wordpress-blogging-blogger-editor-265132/
As you add content to your WordPress website, it will appear in the form of pages and posts. Pages are considered to be static, and that is why it is more appealing to business owners. Pages and posts are an essential part of WordPress. Decide whether you need a page or post to pose as the homepage of your website.
Here are the steps to adding posts:
- Add a post to your website
- Go to the admin dashboard where you click on Pots and choose the option ‘Add New’.
- You will add a title for the post, add images, and change the format and insert page elements through shortcodes and blocks.
- Click on the option that says “Save draft” to save all the changes that you have made
- You can also click Publish if you want to take the post to live immediately
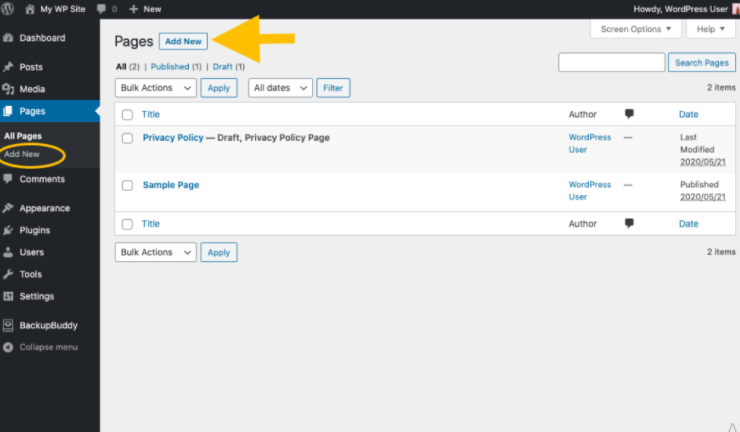
Image source: https://ithemes.com/tutorials/how-to-add-page-in-wordpress/
Below, we will list some of the most common pages that are used while creating a website page.
- Homepage
- About Us
- Services/Products
- Contact us
You can add more pages if you want to. Suppose if you have to build an essay help website, you will require to add more pages like essay writer experts, samples, reviews, essay tools, etc.
Step 7: Choose a specific design for your website
There are several ways you can customize the design of the website.
Here are the steps:
- Customize the title of your website.
- Select the option Settings from your admin dashboard and choose the option ‘General.’
- You will have to add your website title and tagline
- You may also toggle information like email, time zone, URL, and more.
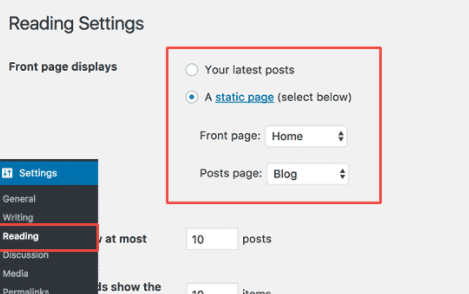
Image source: https://www.wpbeginner.com/guides/
For customizing the reading sections, go to settings and select reading. You may change the home page to a static page. This is a perfect setup for a business owner who wants to see all content in one place on the website. But if you are a blogger who prefers having the newest content at the top of your pages, your visitors will be able to find all the latest posts.
You can also customize the navigation bar, helping your visitors easily find information on the website.
You can easily add the navigation bar by moving to the admin dashboard, clicking on Appearance, and selecting Menus.
Step 8: Install all the necessary plugins
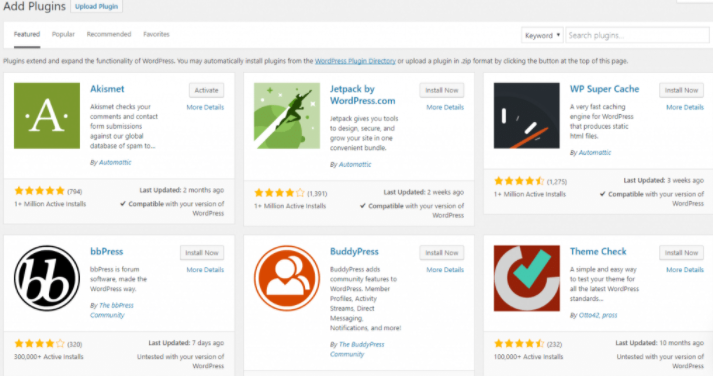
Image source: https://kinsta.com/knowledgebase/wordpress-plugin/
There are over 55,000 plugins available for every type of website and user. These are like little pieces of software equipped with different functionality, which eventually enhance the user experience. You will find a notification at the top of the screen asking you to install the necessary WordPress plugins. Here are the steps you are required to follow:
- Click on the link which says Being Installing Plugins.
- Select all the necessary plugins and click on the install button in the drop-down menu.
- Go to plugins and move to all plugins options.
- Finally, click on the link to begin Activating Plugins
I have listed out some of the most popular plugins. Here are they:
- The Events calendar
- The SEO framework
- Yoast SEO
- HubSpot WordPress Plugin
- Elementor
- TablePress
Step 9: Improve the performance of website
Your website performance will be a critical part of the user experience. If your website page takes too much time to lead, your visitors will get frustrated and move quickly to another site. But you can improve it improving the performance by enabling browser caching. Browser caching denotes the process of temporarily storing the website’s data on the visitor’s browsers.
Step 10: Take inspiration from examples of WordPress website
It is easy to get overwhelmed and confused with numerous options in WordPress. Professional essay writers suggest taking inspiration from examples rather than doing it from scratch. By looking at a few websites, you will have a basic idea of where to start and design or promote.
Few suggestions for popular websites:
- Houston Zoo
- Awesome Motive
- 99% Invisible
- Virgin America
- Beagle
- MovieMark
- Reductress
Wrapping up,
The process of building the website on your own will not be difficult once you have access to WordPress. Although there are too many options to consider with the guide, it will be easier for you to create a big impression.
AUTHOR BIO: Clara Smith works as a social media marketing manager in one of the UK’s biggest firms. She is also a part of AllEssayWriter.com, where she is one of the best expert essay writers. She is also a freelance website designer.